Special preferences should be made for designing a safe and comfortable bathroom for disabled persons and should help them become more independent.
It is common to see the term “handicap accessible “used, but person-first terminology is recommended when possible (for example, “accessible for persons with disabilities”). This best practice guide will provide an overview of features and adaptations people can attend to when planning or remodeling a bathroom for disabled use.
Key Elements of an Accessible Bathroom
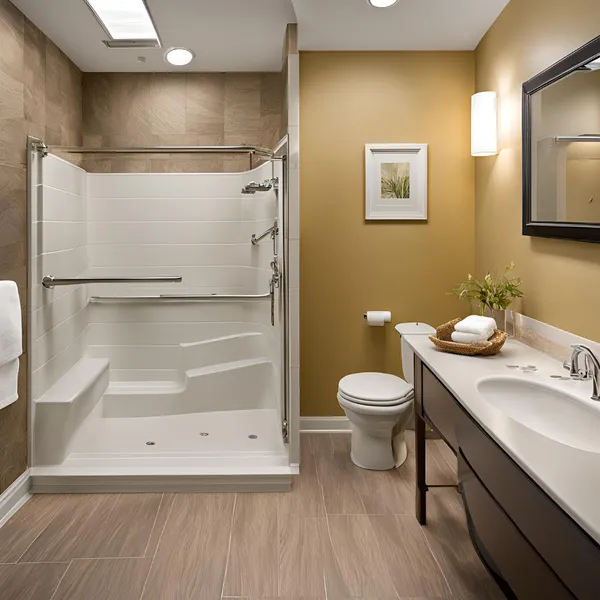
Grab Bars:
Grab bars provide crucial support and stability for individuals with mobility challenges, aiding them in safely navigating the bathroom.
- Placement is key: Place grab bars around the toilet, shower, or wherever someone might sit or lean on while using the bathtub.
- Choose the right type: Select aluminiumm as your material and use a Series 600 or 700 shower base/base flashing for a low-profile grab bar that offers a non-skid surface that is distinguishable by its colour from the walls.
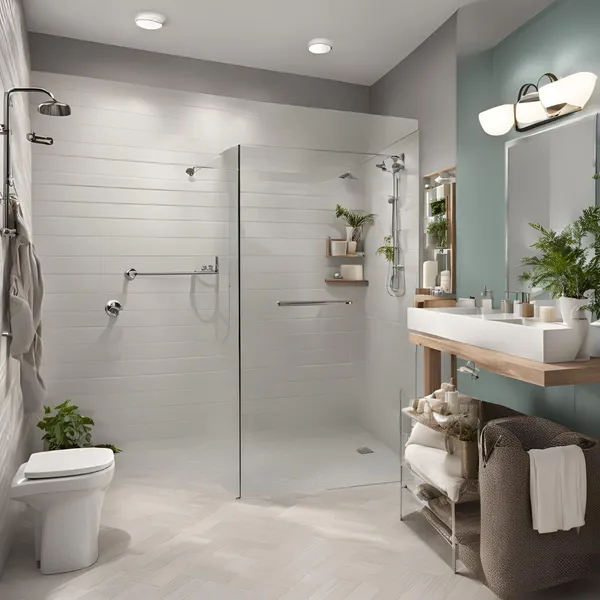
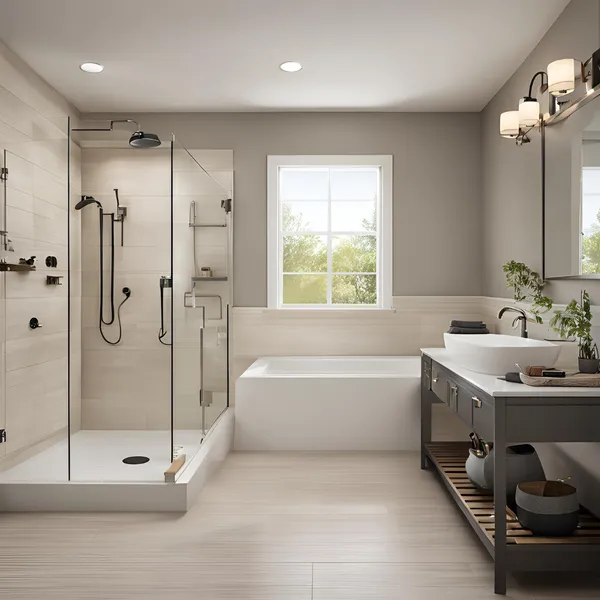
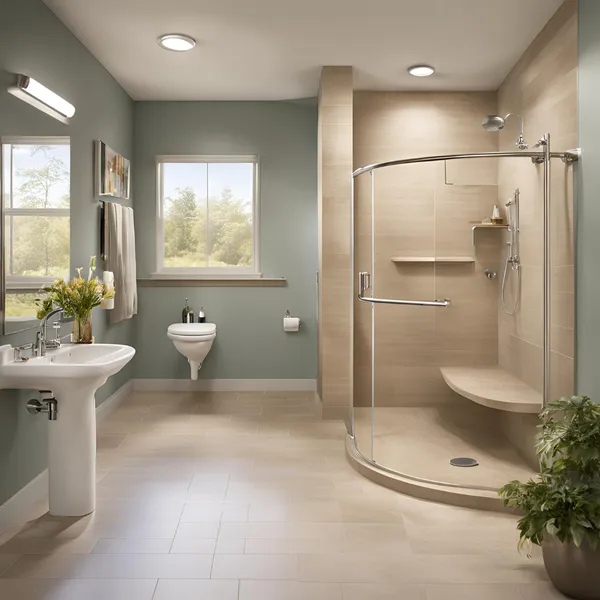
Walk-in Showers:
Walk-in showers also offer no barrier; due to this, it becomes very easy for physically challenged persons to get in and out of the shower.
- Zero-threshold entry: Ensure a seamless transition between the bathroom and shower floors.
- Consider a built-in seat: A shower seat can be used by a user during showering, and there is reduced strain or tension that may result in falls.
Non-Slip Flooring:
Wet bathroom floors can be hazardous. Select flooring materials with less tendency to slip to reduce accident-prone cases.
- Textured tiles: In particular, textured tiles have a superior coefficient of friction than smooth tiles.
- Non-slip mats: Put rubber mats on the shower and bathtub as well as outside the shower and bathtub since there is normally a high risk of slipping.
Accessible Fixtures:
- Lever-style faucet handles: Like the other biasing features of lever-style handles, it is easier for those with poor hand movement than the knob-style handles.
- Handheld showerheads: Bathtub hooks are more flexible and have longer arm reaches than the holder shower head to allow the users to shower without assistance.
- Comfort-height toilets: Typical comfort-high toilets are raised about 5 ½ inches above ground levels and help individuals who want to sit and stand effortlessly.
Adequate Space and Clearances:
Ensure sufficient space for a wheelchair or walker to manoeuvre comfortably within the bathroom.
- Doorways: It is recommended that the doors be of such width to accommodate a wheelchair or a walker.
- Turning radius: Provide ample turning radius within the bathroom for wheelchair users to move freely.
Factors to Consider when Thinking about Accessibility
Lighting
Brightness is important for security and clear seeing during the evening. Some lighting choices a person can incorporate should qualify under ambient, task, and accent lighting to provide enough light in the environment.
Mirrors
Tile the bathroom mirror slightly downward to make it easier for wheelchair users to see their reflection.
Storage
Provide accessible storage solutions that are easy to reach and use, considering the needs of individuals with limited mobility.
Temperature control
Use anti-scald devices on all shower valves to avoid scalding, having a place for children with less feeling in their skin or older people who are easily burned.
Visual and auditory cues
Different areas should be distinguished at the edges, and steeper changes in height should be made to help the orientation. It is advisable to provide audible alarms for safety reasons in the case of emergencies.
Universal Design Principles for an Inclusive Bathroom
Universal design is something other than something one does on the basic minimum regulatory requirements. It’s about designing a fun and functional environment for children, adults, the big, the small, the table, people with disabilities, and even those temporarily restricted in certain ways – such as when one has a broken arm! Here’s how those principles play out in the bathroom:
Equitable Use
- Example: A show with at least two shower head options: A permanent one and the other being portable. This is suitable for people of different statures, individuals with disabilities, and those with an affection for shower-sitting, singing or dancing, bathing pets, or scrubbing the shower.
- Benefit: Lack of stigmatisation that everyone feels free to use the designed area.
Flexibility in Use
- Example: A sink with a height flexibility. This caters to the mobility of confined people in wheelchairs and those who prefer standing.
- Benefit: The bathroom adapts to the user, rather than the user having to adapt to the bathroom.
Simple and Intuitive Use
- Example: Turning handles on the bottom like a lever instead of knobs. These are easier for people with arthritis or limited hand strength; most clients will understand their operation better.
- Benefit: Reduces confusion and the need for instructions, making the bathroom user-friendly for guests, people with cognitive differences, and those unfamiliar with the space.
Perceptible Information
- Example: Arrange the toilet so its walls contrast with the toilet seat. This assists those with reduced visibility in identifying the seat with much ease.
- Benefit: Safeguards the fact that crucial data does not remain hidden from any party due to senses-related issues.
Tolerance for Error
- Example: The anti-scald devices are on the faucets and showerheads. This reduces the chances of accidental burns, which are especially dangerous to children, the aged, and individuals with impaired sensibility.
- Benefit: Minimizes hazards and the consequences of mistakes, making the bathroom safer for everyone.
Low Physical Effort
- Example: A moving door that is instead of a swinging door. This is easy to operate compared to the above type and requires less force to open for those with weak upper bodies.
- Benefit: Conserves energy and reduces strain, making the bathroom more comfortable, especially for people with fatigue or chronic pain.
Size and Space for Approach and Use
- Example: Ensuring enough clear floor space surrounding a toilet and wash basin. This enables a wheelchair or walker to be moved around securely.
- Benefit: Make sure each individual can comfortably walk up to, reach, and utilise fixtures and components that follow this standard.
Bathroom Handicap Accessible
Making Your Bathroom Accessible: A Step-by-Step Guide
Here are steps-by-steps:
1. Assessment:
Detailed Evaluation:
- Measure everything: Width of the door and corridors, space required around a wash basin, toilet, etc., manoeuvrability space, shower spa,ce and dimension, and so on. This data is very useful for defining changes needed in the further course of the utilised model.
- Identify potential hazards: Flooring that becomes wet or smooth, stairs or ramps, low or dim lighting, no grab bars available, and recessed light switches.
- Document existing conditions: Take photos and videos to record the bathroom’s current state.
User Needs:
- Who will be using the bathroom? Take into consideration the challenges and the physical condition of their respective clients.
- Involve the user in the process: The best thing to do is get recommendations on design and the features they prefer.
Professional Consultation:
- Occupational Therapist (OT): An OT can help identify a user’s needs and recommend modifying a bathroom for independence and safety.
- Certified Aging-in-Place Specialist (CAPS): To effectively serve a CAPS professional, they should have information on how homes can be constructed and modified for those who require homes at the present and homes that can be modified should one want to age in place.
With the help of the detailed instructions outlined above, you can guarantee that your bathroom remodelling project will create and design a truly functional environment for the target clients with disabilities.
2. Planning
Develop a Comprehensive Plan:
- Prioritise modifications: Based on the assessment and needs of the user, identify which of the changes are critical.
- Create a layout: Prepare a graphic that includes all the changes and items to be installed, such as the fixed bars and clear floor space.
- Select materials and products: Choose accessible fixtures, non-slip flooring, and other materials that meet accessibility standards.
Budgeting:
- Get quotes from multiple contractors: Always check for price and quality to get the most for your money.
- Explore funding options: Check for government programs or grants that may assist with the cost of accessible home modifications.
Permits and Approvals:
- Research local building codes: Make sure that the changes you plan will be made conform to all the provided laws.
- Obtain necessary permits: Call your local building department to learn about the required licenses.
3. Implementation
Hire Qualified Professionals:
- Experienced contractor: Select a contractor with a proven track record in accessible bathroom renovations.
- Licensed professionals: Be cautious when selecting professionals, such as plumbers, electricians, etc., to work on your home. Make sure they are legally certified and insured.
Accessibility Standards:
- ADA Compliance: Follow the Americans with Disabilities Act (ADA) guidelines for bathroom accessibility.
- Local codes: Remember to follow any local building code you might find extra demands.
Project Management:
- Regular communication: It is proud to keep the contractor continually informed during the work’s progress.
- Monitor progress: Easy – Site observation/inspection to monitor progress and quality checks on overall construction.
4. Evaluation
Thorough Inspection:
- Test all features: Ensure all accessible features function correctly and are easy to use.
- Check for potential hazards: One must then look for any remaining barriers or safety concerns.
User Feedback:
- Get input from the user: Ask for feedback on the bathroom’s accessibility and usability.
- Make adjustments: With user feedback, it is possible to determine what changes are required in rendering or if further adjustments should be made to enhance accessibility.
Ongoing Maintenance:
- Regular cleaning: Keep the bathroom clean and clutter-free to maintain accessibility.
- Periodic inspections: Perform checks occasionally for any signs of repairs or things threatening employees’ safety.
Conclusion
For those with limited mobility or other disabilities, maintaining a safe and comfortable bathroom is essential – and worth the cost. You can make a bathroom suitable for anybody if you try to follow the tips presented in this article. Even if the minor changes, they pay off by making the bathroom more accessible and easier for anybody to use.